
A construction proposal template in Word is a great tool to equip your sales team or your estimators with. That is because a proposal is one of the most important documents you send to your clients or potential customers. And you want your proposals to be professional, catch your prospective clients’ attention, and offer all the information needed for them to make a decision favorable to you.
Since Microsoft Word is a popular application to create business documents, we built a step-by-step guide to help you build a professional proposal template in Word. Divided into sections, this Word proposal template outlines your company’s objective, the scope of work, cost breakdown, exclusions, terms and conditions, and more. This proposal template for Word contains placeholder information and pre-formatted tables to guide sales representatives as they write their next proposals. Any type of construction company can use this step-by-step guide, be it general contractors, contractors, subcontractors, engineering firms, small businesses and large companies as well.

In this article we’ll build the below proposal template in Word step by step.
In this article:
- What Is A Proposal Template
- What Is Included in a Proposal Template
- Proposal Template in Word Step-by-Step Instructions
What is a Proposal Template
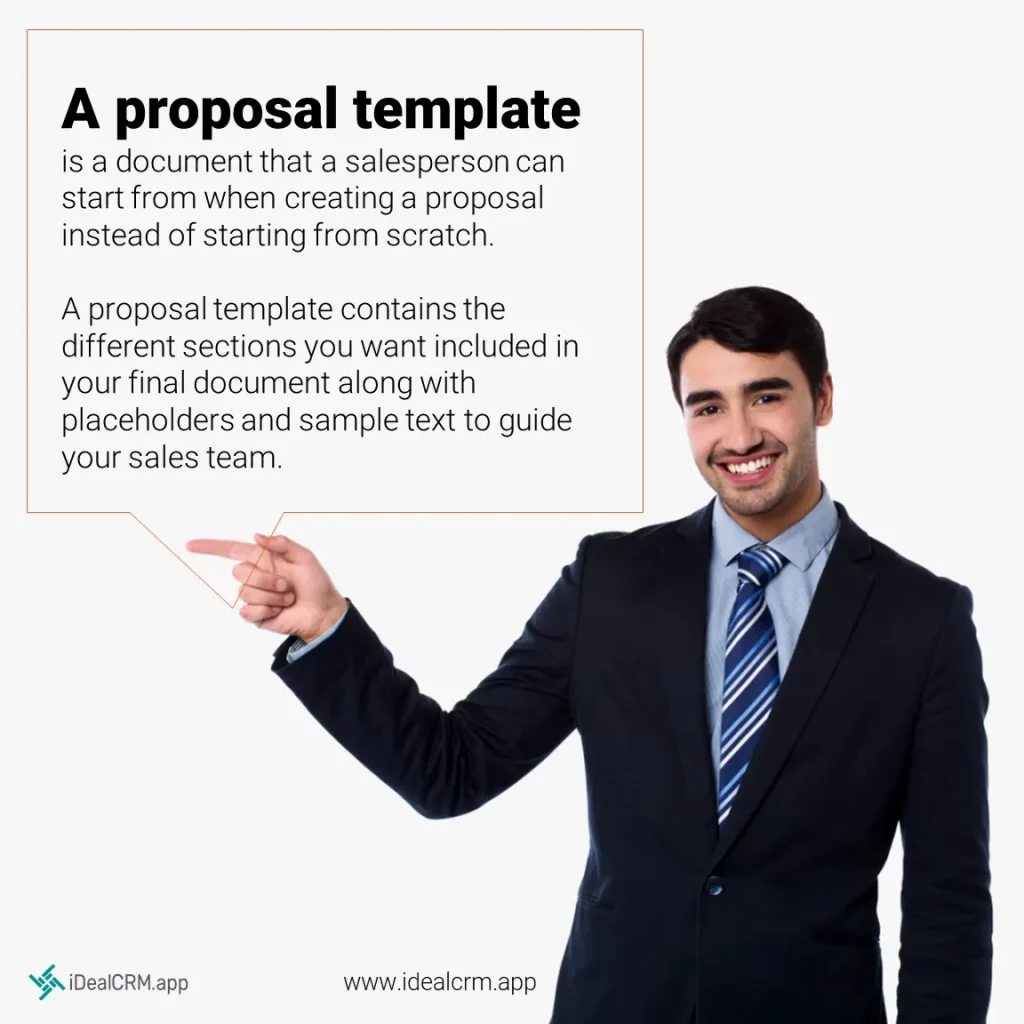
Simply put, a proposal template is a document that a salesperson can start from when creating a proposal instead of starting from scratch. A construction bid proposal template contains the different sections you want included in your final document. It should also feature placeholders and sample text to guide your sales team step by step.
Two of the most important benefits of having a library of construction proposal templates are:
- reducing time to create proposals
- ensuring a consistent look across your bids / estimates that strengthens your brand, impresses your potential clients, and gets the project management team off to a great start
What is Included in a Proposal Template
Proposal content depends on the occasion and project you are bidding, but at the very least, you need to include your client’s and project information, description of scope, price, and terms and conditions. Don’t forget your company’s information of course and mention the blueprints or drawings you used for your estimate if applicable. We recommend creating a variety of estimate templates or proposal templates, to cover every type of project you bid. Here’s a more complete list of proposal elements.
- Cover Letter
if applicable – omit if a short, concise proposal is needed as in the case of commercial bid proposals for example where GCs receive tens of proposals for a project - Specification of Parties
- Scope of the Project
- Materials
- Labor
- Insurance
- Equipment
- Exclusions (especially work that you won’t be doing at the job site)
- Lead Times
- Cost Breakout or Cost Estimate
- Terms and Conditions including Payment Schedule and Warranty Terms if applicable
- Alternates
For an in-depth description of these elements, read our Construction Proposal Elements.
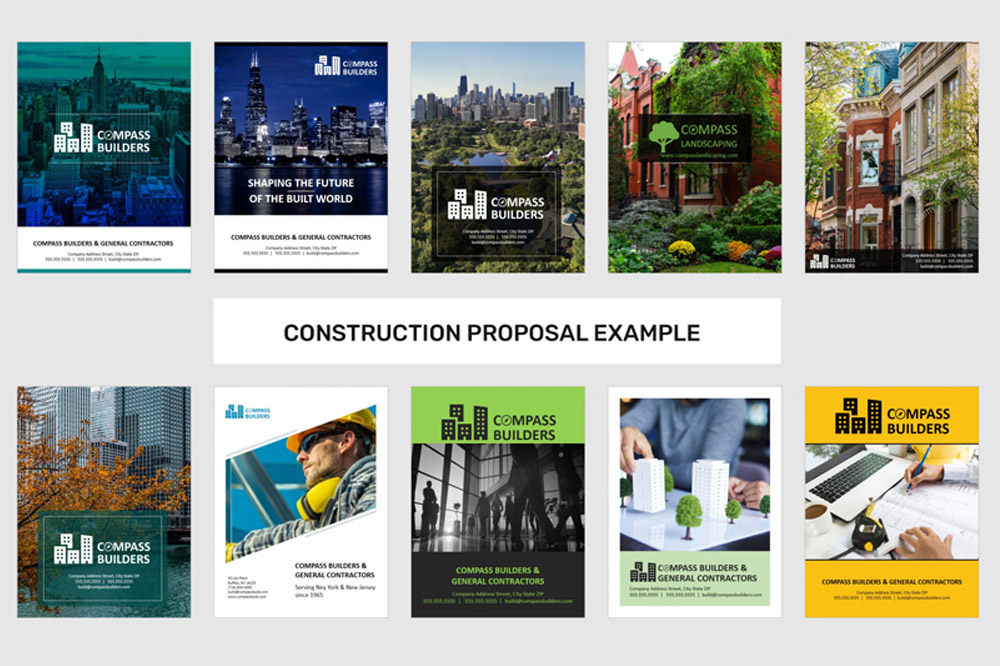
Go to www.constructionproposaltemplates.com for detailed construction proposal templates tailored to each trade.
Create Your Construction Proposals Online in Minutes
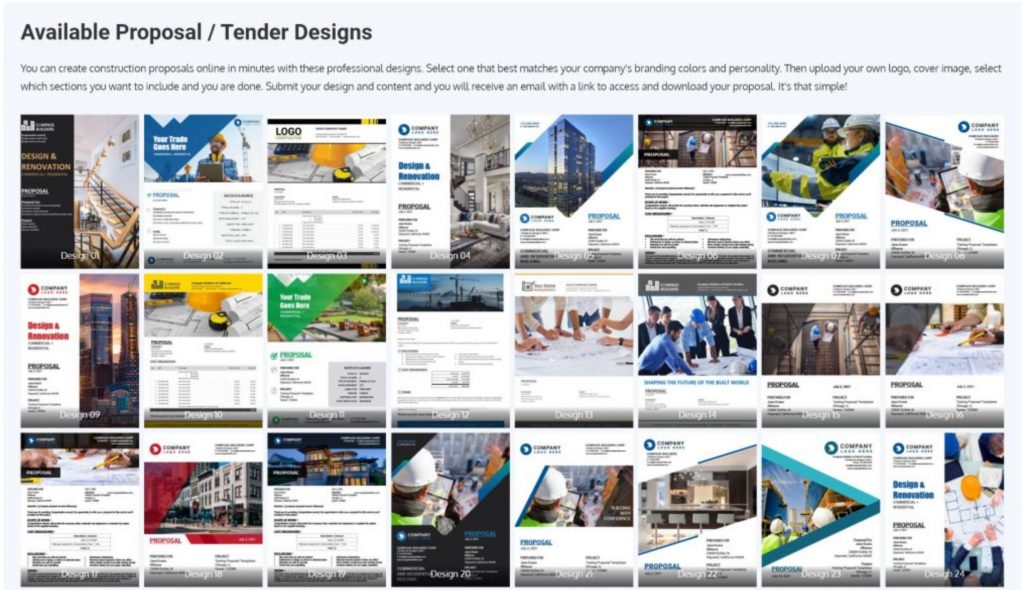
Download Construction Proposal Templates
Build a Proposal Template for Word – Step-by-Step Instructions
- Set margins
- Set header & footer for cover
- Cover design – add a picture
- Cover design – add a background
- Cover design – add a company logo
- Add client, project, and your company contact information
- Designing the header for the pages
- Designing the footer for the pages
- Add the content
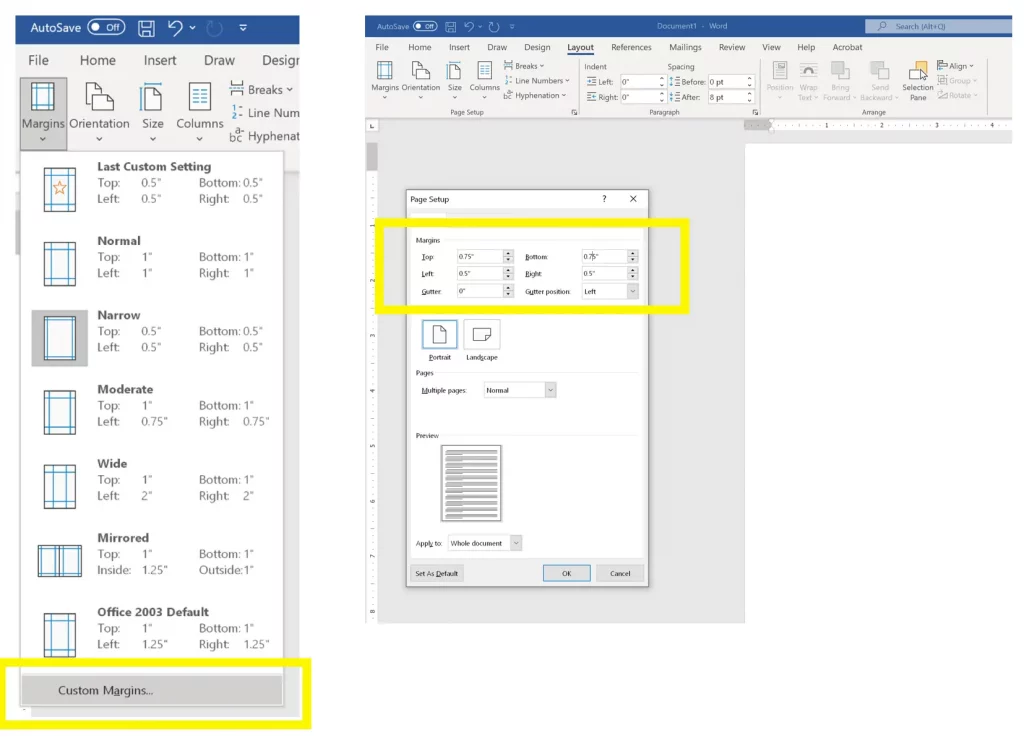
Step 1: Set margins
Before adding any elements or text to our proposal template in Word, we’ll set the document margins and header and footer.
- Open Word
- Click on Layout, Margins, Custom Margins
- Change margins from 1 to 0.5 for left and right and 0.75 for top and bottom (or 0.5 for all)
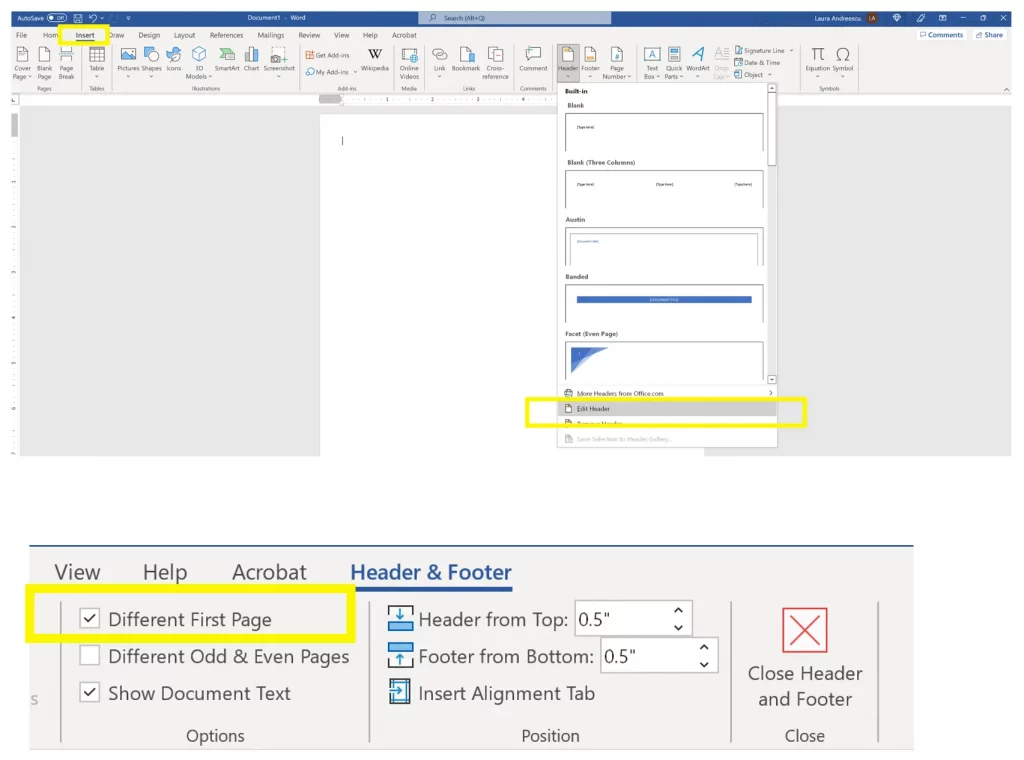
Step 2: Set header & footer for the cover
- On the ribbon, click on Insert
- Open Header menu
- Click Edit Header
- On the Header & Footer menu, select ‘Different First Page’
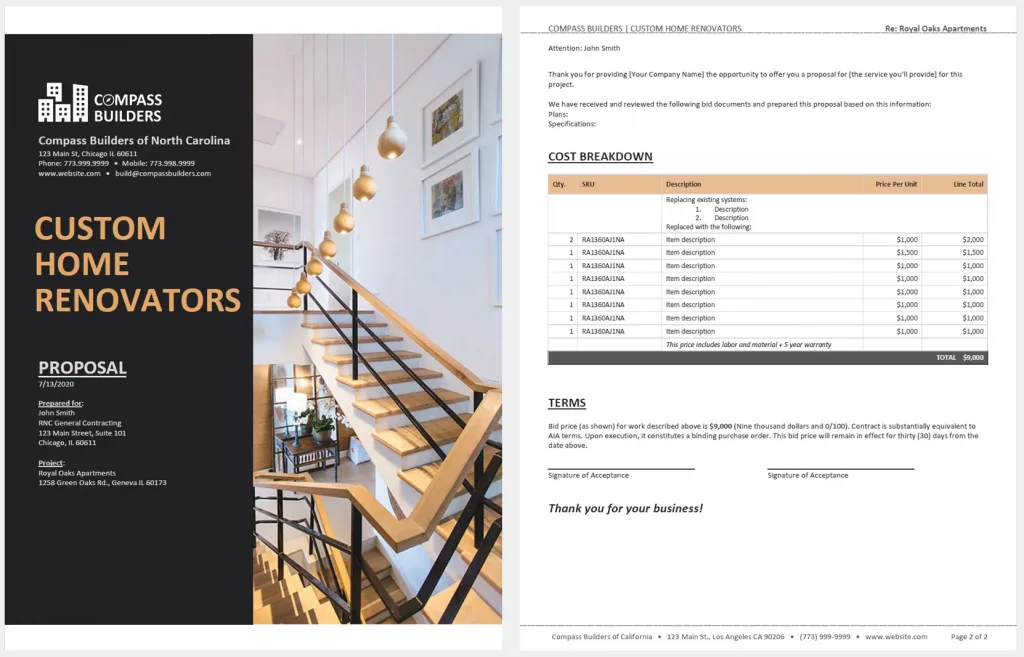
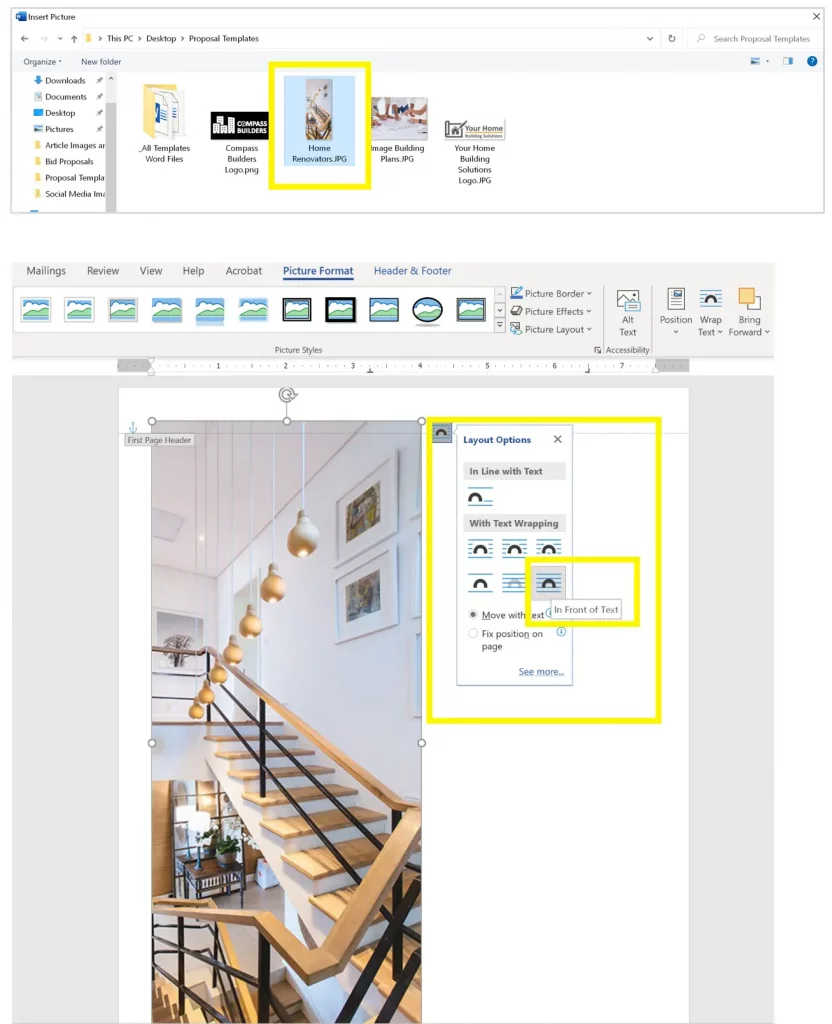
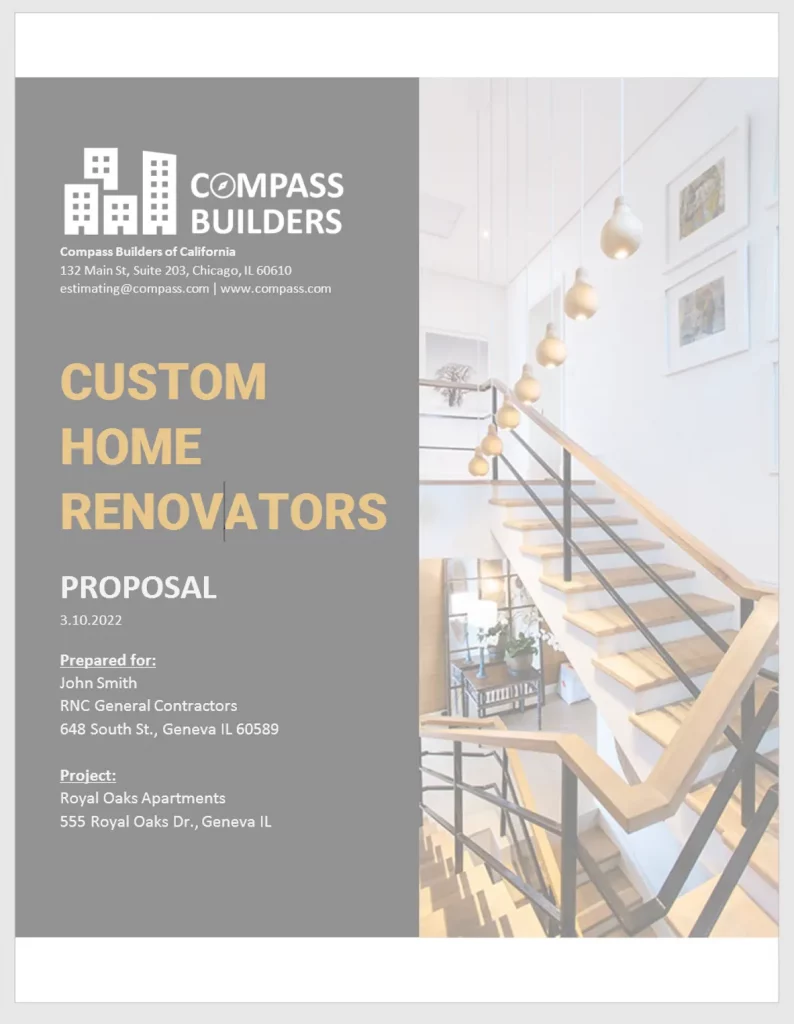
Step 3: Cover design – add a picture
In this example, we are creating an eye-catching graphical cover instead of a simple cover letter. This is one of the most complex designs, with graphics and backgrounds behind text. The trick to having perfectly aligned graphics behind text in MS Word, is to put the graphics in the ‘Header’.
- Double click at the top of the document to enter the Edit Header mode. Or click Insert -> Header -> Edit Header
- Next, we’ll place the picture on the right in the header.
Click Insert -> Pictures -> This Device - Select the picture you want to insert
- Click Insert
- With the picture selected
- Click on the Layout Options
- Select the bottom right one ‘In Front of text’
- Now we can move the picture off to the right of the screen
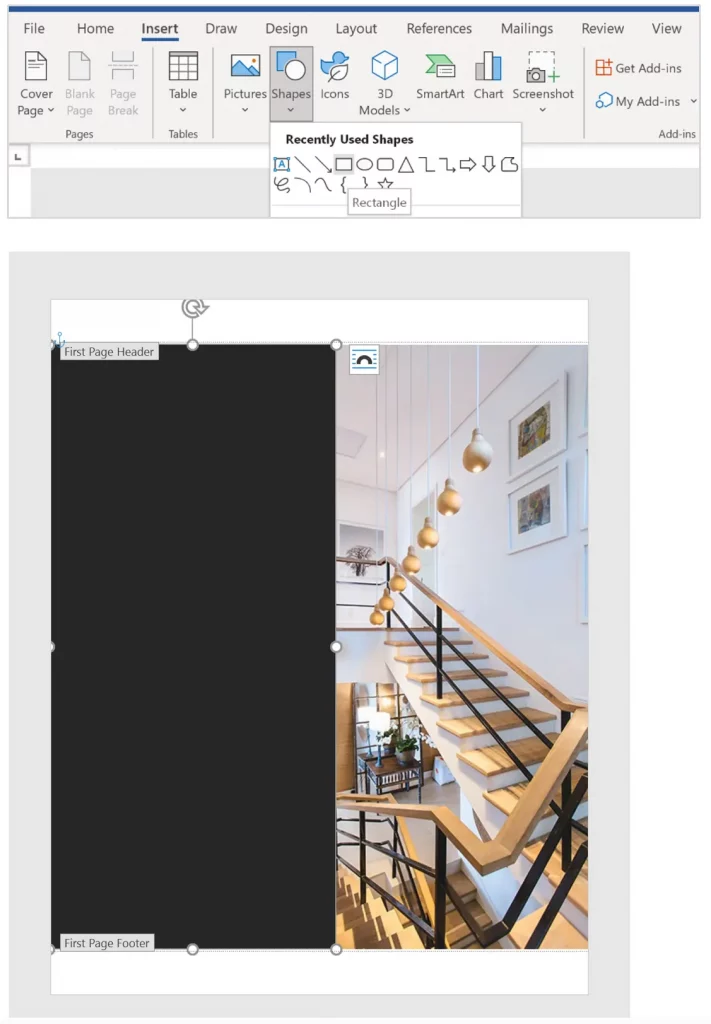
Step 4: Cover design – add a background
Still in Edit Header mode:
- Click on Insert -> Shapes
- Select Rectangle
- Draw a rectangle that is as high as the picture and fills the white space
Step 5: Cover design – add your company logo
Still in Edit Header mode:
- Click on Insert -> Pictures -> This Device
- Select Your Company Logo (we need an image without background for this design, or match the rectangle background to the logo background)
- In Layout Options select ‘In Front of Text’
- Resize the logo and place it on top of the color block
- Exit ‘Edit Header’ mode (double-click on screen outside the page)
Step 6: Add client, project, and your company contact information
In regular edit mode:
- Add the name of our company under the logo along with contact information
- Add your tagline or specialty – make this text bigger, a different font, and a color that matches the picture on the right
- Type in today’s date
- Add your client’s information
- And project information under that
Step 7: Designing the header for the pages
On the first page:
- Click enter until you generate a second page
On the second page:
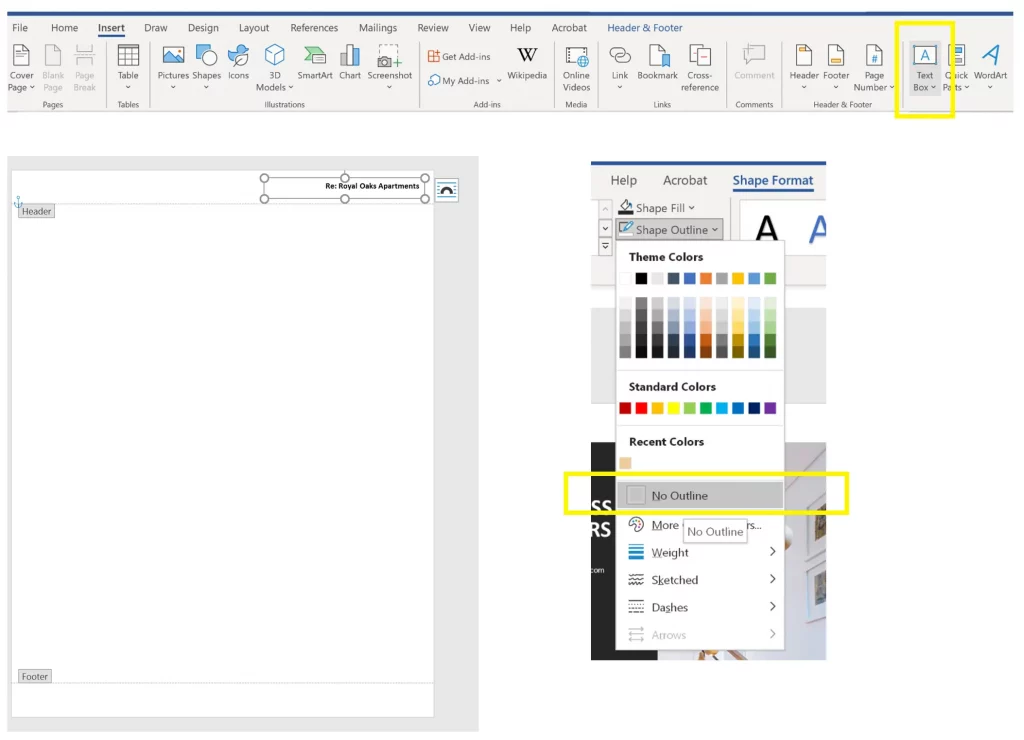
- Enter Edit Header mode (double-click at the top of the page or Insert -> Header -> Edit Header)
- Click somewhere in the Header
- Click Insert -> Text Box on ribbon
- Type the name of the project
- With the text box selected, click Shape Format -> Shape Outline -> No Outline to remove the text box border
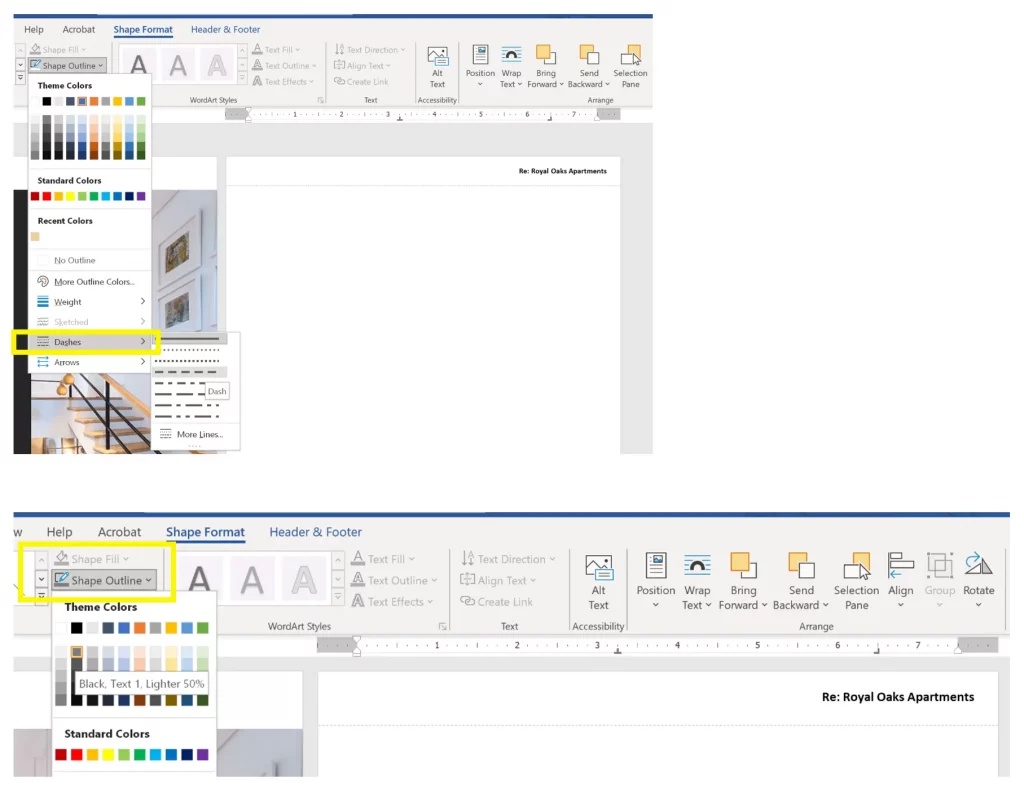
Still in Edit Header mode on the second page – insert horizontal line:
- Click Insert -> Shapes -> Select Line
- Draw a line in the header from the left margin to the right margin (to draw a straight line, hold down shift while drawing)
- With the line selected: Click on Shape Format -> Shape Outline on the Ribbon
- Select Dashes
- With the line selected: Click on Shape Format -> Shape Outline and select a gray color for the line
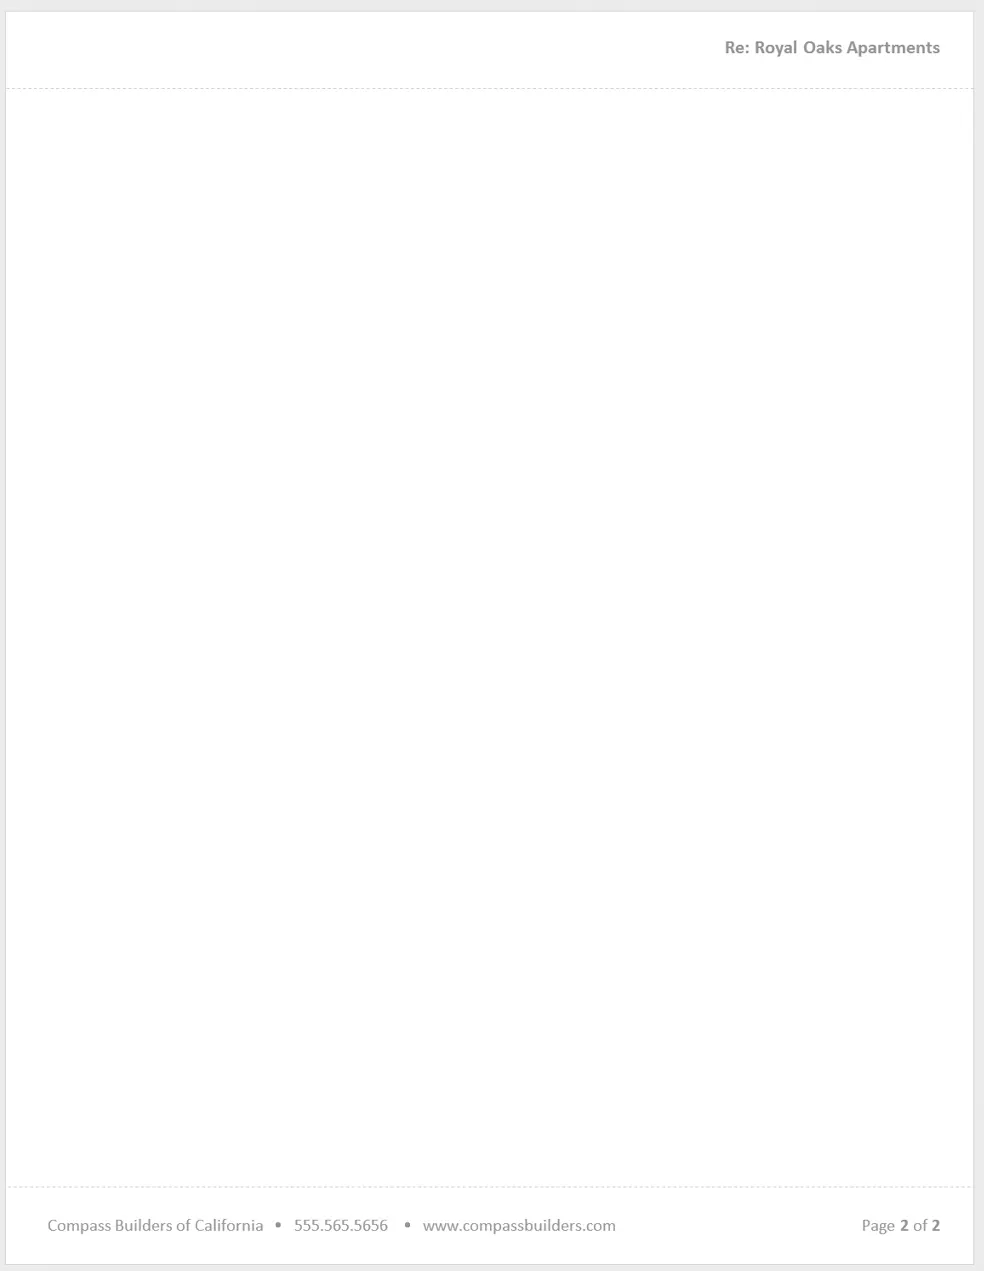
Step 8: Designing the footer for the pages
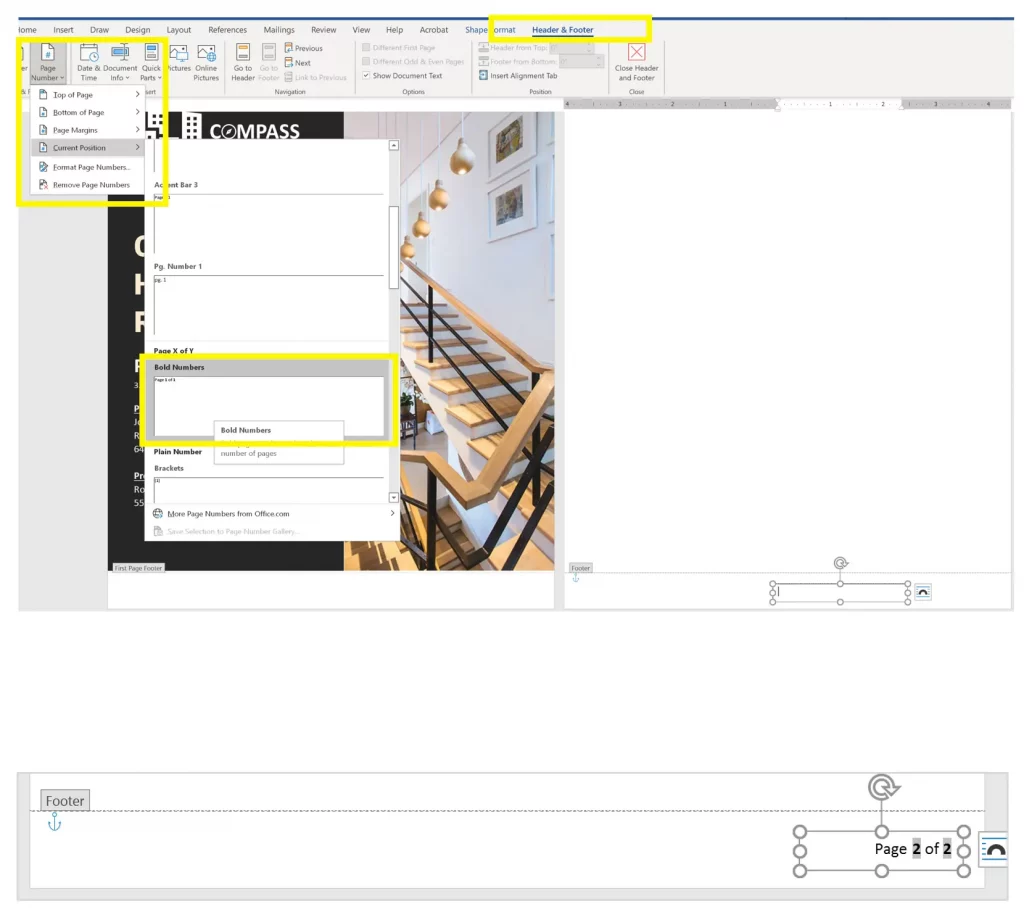
Still in Edit Header & Footer on the second page:
- Draw the dotted line the same way you did in the Header
- Then Insert -> Text Box -> Draw Text Box and draw a rectangle in the Footer
- With the text box selected, click on Header & Footer on the ribbon
- Select Page Number -> Current Position -> Style you want (Page 2 of 2)
- Align the text to the right and remove text box border as we did before
Still in Edit Header & Footer on the second page:
- Then Insert -> Text Box -> Draw Text Box and draw a rectangle in the Footer
- Type your company’s information
- Remove Text Box border as before
- Place the text in the footer so it aligns with the page number
Step 9: Add the content
Now that our Header and Footer for the rest of the pages are designed, we place the content of our proposal on the second page.
The minimum sections we recommend for a proposal are Scope, Cost Breakdown, Terms & Conditions.
- Scope of Work (can be stated in the introduction)
- Cost Estimate or Cost Breakdown (as simple or detailed as you think is needed)
- Exclusions, especially work that you won’t be doing at the job site
- Any other sections you may need such as materials, labor, schedule, insurance, FAQ
- Terms & Conditions
- Signature lines if needed
Your proposal is now ready to be turned into a PDF and sent to your client.
Get Expert Advice from iDeal CRM
Are you still having a difficult time creating a proposal Word template for your construction business? Get our expert advice either in the form of a 30-minute consultation or by joining on of our live workshops on the topic.
30-minute Consultation – Get expert advice from one of our construction consultants
In this personalized 30-minute online consultation you will discuss the specifics of your proposals and any other needs related to construction project management. Our team of construction consultants will analyze your current proposal and suggest changes to improve the layout and look and feel. They may suggest starting your proposal template redesign process from one of our free templates or a complete custom redesign. Either way, you will leave the meeting with a construction proposal template in Word that is ready to be used.
Live Workshop – How to Build a Construction Proposal in Word
In this live online session, you will learn how to build a professional-looking proposal in Word. You will go over cover design, cost table, and other graphic elements. At the end of the workshop you will receive a link for you to download ready-to-use, pre-designed proposal templates.
Register now for the next workshop on how to build a professional proposal in Word.